I recently learned of the existance of the Web Share API: this browser feature provides a mechanism for sharing text, links, files, and other content to an arbitrary share target selected by the user. I have adapted the Share feature here in this blog to use the Web Share API where available. The API is currently supported by Edge, Safari and most mobile browsers.
I’ve been a passive user of Twitter for over two years now. My last tweet dates from 8 August 2021. Since the pandemic began, the number of tweets from conspiracy theorists has risen sharply and finally reached an unbearable level for me. I removed my Twitter client (Fenix) from the home page of my phone and ignored Twitter for months. I never really went back. After a while, I did check my timeline from time to time, but that too ended with the third-party client ban in January 2023.
It's officially over. No more Fenix on Android, iOS or macOS.
Fenix for iOS was suspended earlier today and I've removed it from sale.
I've had a great time working on these apps for the past 10 years and I'm very greatful for all your messages and support. pic.twitter.com/ibVZng78Ra
A few months later I started using Mastodon. It’s still a very small community, and so far it has none of the toxicity that X has developed. On Mastodon, I also came across a post describing how to host your exported tweets as your own archive. This is even more relevant as X forces users to sign in to browse tweets since June 2023.
Since I'm seeing a new wave of people saying they plan to leave Twitter, you may like my browser tool that takes the zip file of your Twitter export and returns a zip file of a web site that lets people browse and search your tweets. You can just upload the files wherever you normally host html and it'll work just fine.
As I did not like the look and feel of the suggested web application I did a little research and found tweetback. I exported my data from X, extracted my tweets, and published my archive at tweets.davidfuhr.de. I also removed the X widgets integration and replaced the links to my X profile with a link to my personal archive. I’d be happy to see more media outlets join the Fediverse to fuel discussions there and make X less relevant.
Renovate LogoKeeping your dependencies up-to-date is a chore. Updating dependencies often gets neglected while working on new features and busy improving your application. But it is necessary to keep your application safe and secure. Renovate reminds you of new dependency releases and makes upgrading a bliss.
Renovate is a standalone node application. It scans your repositories for dependencies and creates Pull Requests (aka. Merge Requests) for the dependency updates. It supports a wide range of “package managers”, including Maven, Gradle, and npm, but also Dockerfile and bitbucket-pipelines.yml. Each update is proposed in a separate Pull Request containing information like Changelogs of the dependency and Renovate’s instructions on how to work with the PR. Your build pipeline with your automated tests will automatically verify if your application still works with the updated dependency. If you have enough confidence in your build pipeline, you can configure Renovate to auto-merge the PRs. Otherwise, you can merge the PRs yourself.
This article was originally published at esentri.com.
Scaling development
Microservices are well-known now for some years and are widely adopted. But the frontend oftentimes is still monolithic. This application structure often reflects on the team structure: there are several independent backend teams and one single frontend team. This also prevents backend development teams from delivering complete usable features - they always lack the frontend. To implement the frontend all changes must be done by the one frontend team. This makes it hard to scale development. By implementing micro frontends we can form full-stack teams that can ship complete features on their own. This is one of the reasons why ThoughtWorks placed micro frontends in the “Adopt” section of their famous Technology Radar for the third time in a row!
This article was originally published at esentri.com.
I recently implemented a simple maintenance mode for a REST API. Letting the web server return a 503 Service Unavailable sounds easy enough. But there was a catch displaying a maintenance page in our Angular client application.
I am a fan of a clean git history. It should be easy to spot which commits belong to which feature, which feature was merged when, and what changes were made by whom. I’ve seen several git histories that look more like a pile of spaghetti and it takes a lot of effort to understand the history. I will explain how you can keep things neat and clean by using rebase and how to avoid the pitfalls I ran into.
Git History with Pull Merges
If your git history looks like this and this bothers you this article is for you. With a better understanding of git and it’s features you can make your history look like this.
Git History with Rebase
If you want to know how read more!
Understand merging with --ff or --no-ff
In git there are two strategies to merge branches. Fast-Forward merges and Non-Fast-Forward merges. Let’s take a look at those two strategies, when you can use which strategy and how the result differs.
Fast-forward merges are possible if you have a situation like this:
          D---E---F topic
         /
A---B---C master
The topic branch is ahead of master. But the master branch does not have any additional commits.
If you merge topic with --ff to master…
git checkout master
git merge --ff topic
…you will have the following result:
A---B---C---D---E---F topic/master
Now master and topic are identical. If you delete the topic branch nobody can tell anymore that there was a topic branch once.
Let’s take a look what the result looks like if you merge with the --no-ff strategy:
git checkout master
git merge --no-ff topic
Git will create an extra commit for the merge itself:
          D---E---F topic
         /         \
A---B---C---------- G master
This way it is transparent for everyone what commits belonged to the feature branch and what was merged. It also makes it easier to un-merge the branch. Because you only need to revert the merge commit and you are done.
So my recommendation is if you merge towards the main line use --no-ff. This means merges from topic to develop or develop to master should always be done with --no-ff.
Merges away from the main line could be done using --ff but continue reading to learn about an even cleaner approach.
Understand rebasing
With rebase you can move commits. Strictly speaking you do not move the commits, but you reapply the commits somewhere else. New commits (with new commit ids) are created, your old commits are removed. This can be used to “catch up” on the changes of master or any other branch.
Let’s assume the following situation:
      A---B---C topic
     /
D---E---F---G master
Now you want to update your topic branch to include the latest changes from master. You could merge masterto topic but this would create a useless merge commit (--no-ff is not possible because both branches have additional commits). A cleaner solution is to rebase your topic branch onto the current master.
git checkout topic
git rebase master
The result will be:
              A'--B'--C' topic
             /
D---E---F---G master
Your old commits A, B and C have been reapplied on top of master. They have new commit ids and your topic branch contains now the latest changes from master. If your commits don’t apply cleanly on master you have to resolve your conflicts while rebasing. Afterwards you can merge your rebased topic branch conflict free with --no-ff to master. Your merge will cause no conflicts and you don’t have to fix several errors in a big, complicated, bloated merge commit. This will make the history cleaner and better to read.
My second recommendation is to rebase your topic branches regularly to stay up to date and solve conflicts as soon as possible. The fresher the changes are the more likely it is that you still remember why you introduced a change and this will make resolving rebase conflicts easier.
Working with a shared repository
When you work with a shared repository and you start to rebase branches you need to communicate some extra knowledge to your team. Otherwise you clutter you git history with a lot of useless merge commits and it will blow up in your face. That’s basically the reason why people tell you “don’t rebase pushed branches”. Let’s narrow this principle down to the first rule: “don’t rebase your pushed main branches”. It depends on your branching model what your main branches are called but commonly these are master and develop.
By default, when pulling from a remote branch and both, your local and remote branch have additional commits, git performs a --no-ff- merge. This creates an additional merge commit as you learned earlier. To avoid this you can use rebasing while pulling:
git checkout topic
git pull --rebase origin topic
Remembering to add --rebase for every pull is annoying so you can set the default strategy for the topic branch to rebase:
git config branch.topic.rebase true
You can even tell git to set this automatically for every new branch you create:
After rebasing your branch locally you need to push it back to the remote repository. By default git will reject the push as “diverged”. But you can force the push with --force-with-lease1:
git push --force-with-lease origin topic
This is a potentially destructive operation because it will overwrite the remote branch and you will loose any changes not included in your local copy of the branch. So always be careful which branch you push.
Common Pitfalls
Make sure you do not rebase your main branches. If you do this it will almost certainly cause unwanted results. Like inlined merges (like with --ff). So make sure rebase is disabled for your main branches:
This workflow is what works well for me and my teams and after some initial explaining is well accepted. What is your workflow? How do you deal with feature branches and master diverging? Do you care about the transparency of your git history?
While working on an API today I realized the JMSSerializer does not support neither DateTimeInteface nor DateTimeImmutable. I am going to walk you through the necessary steps to serialize DateTimeImmutable objects using JMSSerializer.
Building an own handler requires not much code. The only problem is that documentation is scattered to many places and sometimes hard to find. I’m working on a full-stack Symfony 2.8 with JMSSerializerBundle installed. So make sure you are on the same page before starting.
That’s it. Now your DateTime and DateTimeImmutable objects should be serialized to string similar to 2016-09-28T12:54:07+00:00. If you encounter problems or have further questions find me on Twitter.
Good documentation is the key to utilize an API. But it is difficult to keep documentation and development of you API in sync. Differences between implementation and documentation are often hard to spot. Learn how you can use Swagger to document you API first and profit by testing your implementation against your documentation and vice versa. No duplication needed!
Swagger Logo
I recently started planning a new RESTful API for my company. After some initial discussion on the scope and which API endpoints are needed I set out to write the specification in Swagger 2.0. This provided for a good starting point to the further refinement discussion. It also proved very useful to exchange information with our frontend developers in charge of implementing the first API consumer.
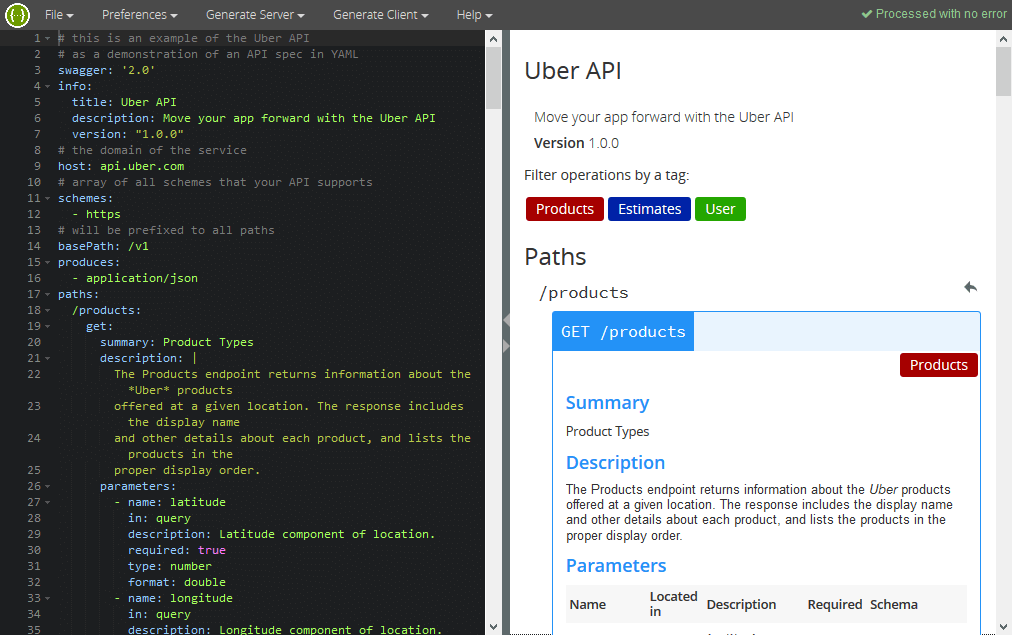
Swagger Editor
At first we started using Swagger Editor and YAML as format (because it is the lingua franca of Swagger Editor). Swagger Editor is a great tool to get started using Swagger. It runs directly in your browser, validates your YAML input and renders a beautiful interactive web interface. We were sending the swagger.yaml file around and I was maintaining the authoritative version of the file. This worked well for the start but it was obvious to us that we needed a tighter coupling to the application and track the file in sync with the implementation.
I had worked with NelmioApiDocBundle before to integrate Swagger with a Symfony application and it is a wonderful tool to document your existing API code. But as NelmioApiDocBundle generates the Swagger file from the annotated source code the source must exist prior to the documentation. This did not match our desired workflow. What’s more, the future of NelmioApiDocBundle seems to be a bit uncertain as the William Durand, the current maintainer, thinks of deprecating the bundle1.
I am thinking about slowly deprecating #NelmioApiDocBundle (feature-freeze first, then EOL). Thoughts?
As I only needed a view component for my Swagger file and had no need for the annotation stuff SwaggerUIBundle was good enough for the job. That made it necessary to convert my Swagger file from YAML to JSON, but that’s no big deal as the Swagger Editor has an export option for JSON. For the Bundle configuration take a look at the installation instructions for static JSON files. This is what my routing configuration looked like:
As I started implementing the first endpoints I also created the first Test Cases in parallel with development. And because I am lazy, I did not want to repeat myself and write the same definitions I already had in my Swagger file for my test assertions again. So I was looking for a way to reuse my Swagger specification in my test’s assertion.
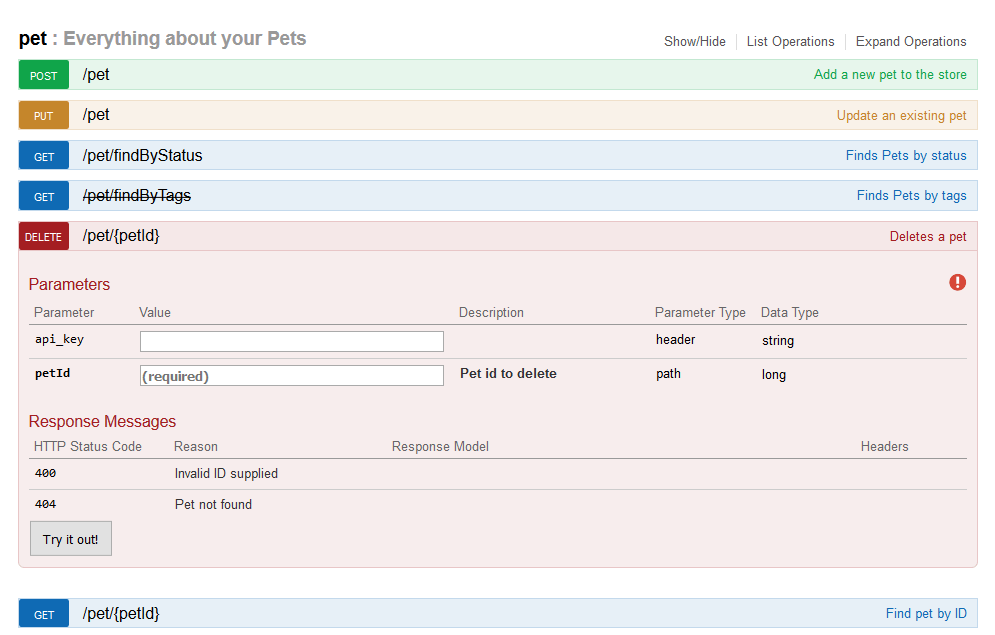
Swagger UI
The model definitions of Swagger 2.0 are valid JSON Schema which aims to be similar as XSD or DTD for XML. And fortunately there is already a library for PHPUnit JSON Schema Assertions. The only problem was I had a single huge Swagger file and I found no way to validate my API response only against a part of the big Swagger definition. JSON Schema allows splitting up the definition into multiple files and referencing these files using $ref. For more information about Referencing take a look at the OpenAPI Guidelines for Referencing, How to split a Swagger spec into smaller files and Structuring a complex schema.
After splitting up the file SwaggerUIBundle did not work anymore because it has problems handling and resolving the JSON references correctly. But that’s not a problem a of SwaggerUI, it’s only a problem of the bundle. As workaround I moved my Swagger files to src/AppBundle/Resources/public/swagger so that Symfony takes care of populating my files in the web root and I adjusted the SwaggerUIBundle configuration to just take that static entry point.
If your JSON Schema uses several nesting levels you might need to adjust the $maxDepth of the RefResover (the component that resolves your $ref).
JsonSchema\RefResolver::$maxDepth=10;
This got me what I want. Whenever there is a change either in the documentation or the implementation it will break the tests and the developer has to make sure both align. This ensures that the documentation is updated on code change and is maintained and also provides easy tests for new endpoints as a bonus!
If you are using NelmioApiDocBundle and looking for alternatives, read this insightful article by David Buchman who coverted his NemlioApiDocBundle annotations to swagger-php annotations. ↩
This article was originally published at flagbit.de.
If you write lots of Console Commands in your Symfony application you sure want
to know more about their memory and time consumption. To collect the necessary
data you can make use of the Stopwatch
Component.
Wir führen unsere Unittests automatisiert beim Push auf das Git-Repository mit Jenkins aus. Bevor Änderungen auf dem Livesystem eingespielt werden dürfen ist ein “grüner Build” zwingend erforderlich. Bei größeren Projekten kam es bei der Ausführung von PHPUnit immer wieder zu Segmentation Faults mit exec returned: 139. Beim zweiten Anlauf funktionierte es dann meistens, aber es ist natürlich sehr lästig, weil dadurch bei einer Dauer von ca. 30 Minuten für einen vollständigen Build das Livestellen unnötig verzögert wird.
In phpunit you can do:
phpunit -d zend.enable_gc=0
Bei meinem ersten Versuch mit deaktivierter Garbage
Collection wurde natürlich das
memory_limit
überschritten. Eine Erhöhung auf 1,5GB löste zwar das Problem mit dem Limit,
jedoch brach daraufhin PHPUnit bei der Erzeugung des Clover-Reports
unvermittelt ab. Diesmal mit exec returned: 143. Google förderte leider kaum
brauchbare Ergebnisse zutage, jedoch lag die Vermutung nahe, dass es eben nicht
so optimal ist, die Garbage Collection für den kompletten PHPUnit-Lauf zu
deaktivieren.
Daraufhin haben wir eine eigene Zwischenklasse zwischen
PHPUnit_Framework_TestCase und unsere TestCases geschoben, in der die Garbage
Collection explizit gesteuert wird. Vor jedem Test wird die GC explizit mit gc_collect_cycles()
aufgerufen, anschließend für den Test deaktiviert und nach dem Test wieder
aktiviert: